从零开始玩转MCP:手把手教你使用 MCP Server 快速搭建专属MCP Client》有很多用户看完之后可能已经“小试牛刀”成功,但肯定不止于此,当你已经知道了MCP的原理以及应用场景之后,接下来就是要干大事了。
今天苏米就开启全新一篇MCP实战,真正的体验用MCP Server + MCP Client 实现一个功能强大的AI Agent,赶紧学起来吧。
本文将带你从零开始,使用 Python 编写一个MCP Server + MCP Client,本项目展示如何使用 MCP Server + Client 实现一个功能强大的AI Agent,支持多服务连接、工具管理和本地大语言模型集成。
你可以学会:
理解 MCP 客户端与服务端的交互模式,深入理解AI Agent的构建逻辑。
构建一个完整的、基于异步(asyncio)的聊天循环,实现从用户输入到模型思考、工具调用,再到最终回答的全过程。
MCP核心架构
两个核心类:
-
Server类: 管理单个MCP服务的生命周期,它处理连接的建立、工具的列出、工具的执行以及连接的优雅关闭。每个 Server 实例对应一个配置好的 MCP 工具提供方。
-
Client类: 总指挥,管理多个Server实例并协调对话流程,它管理着一个或多个 Server 实例,负责从所有服务中收集工具,将其整合后提供给 LLM,并协调用户、LLM 和工具之间的对话流程。
交互流程如下:
-
启动与配置: 客户端读取 config.json 文件,初始化所有在配置中定义的 MCP Server。
-
连接与发现: 客户端异步地连接到所有 MCP 服务,并请求每个服务提供其可用的工具列表。
-
格式转换: 由于 LLM(如 OpenAI API)的工具定义格式与 MCP 的原生格式不同,客户端需要进行一次转换,以便 LLM 能够“理解”这些工具。
-
对话循环:用户输入问题->客户端将对话历史和可用工具列表一起发送给 LLM->LLM 分析后,可能会选择直接回答,或者返回一个或多个工具调用(Tool Call)请求。
在开始之前,请确保你已经安装了必要的环境和库:
-
Python 3.10+
-
PostgreSQL 数据库:确保你有一个正在运行的数据库实例,并创建了相应的数据库和表(例如,一个名为 db 的库中有名为 User 的表)。
-
安装依赖库:
#在虚拟环境下安装PostgreSQL和openai的python库
uv add psycopg 'mcp[cli]'
uv add openai 'mcp[cli]'
MCP Server 实现
上代码mcp_server.py:
import psycopg
from mcp.server.fastmcp import FastMCP
from pydantic import Field
app = FastMCP("bi")
#tool部分
@app.tool(description="使用 SQL 语句查询数据。")
defquery_sql(sql: str = Field(description="要执行的 SELECT SQL 语句")) -> str:
ifnot sql:
raise ValueError("缺少sql语句")
with psycopg.connect("host=127.0.0.1 port=5432 dbname=db user=root password=123456") as db:
with db.cursor() as acur:
acur.execute(sql)
if acur.description:
columns = [desc[0] for desc in acur.description]
formatted_rows = []
for row in acur:
formatted_row = ["NULL"if value isNoneelsestr(value) for value in row]
formatted_rows.append(",".join(formatted_row))
# 将列名和数据合并为CSV格式
return"\n".join([",".join(columns)] + formatted_rows)
return "没有查询到数据"
#resource部分
@app.resource("schema://table")
def get_table_schema() -> str:
result = f"数据表User的列名及数据类型:\n"
with psycopg.connect("host=127.0.0.1 port=5432 dbname=db user=root password=123456") as db:
with db.cursor() as acur:
acur.execute(f"SELECT column_name, data_type FROM information_schema.columns WHERE table_name = 'User';")
for row in acur:
result += f"字段名{row[0]},数据类型{row[1]} \n"
# 将列名和数据合并为CSV格式
return result
#Prompt部分
@app.prompt(name="to_echarts", description="将查询到的 CSV 数据整理为指定的 ECharts 图表。")
def prompt_echarts(chart_type: str = Field(description="图表类型, 例如 'bar', 'line', 'pie'")) -> str:
"""生成一个提示,要求 LLM 将数据转换为 ECharts HTML。"""
return f"""
你是一个数据可视化专家。请将上面通过'query_sql'工具查询到的 CSV 格式数据,转换为一个使用 Apache ECharts 库实现的「{chart_type}」图表。
要求:
1. 生成一个完整的、可直接在浏览器中运行的 HTML 文件内容。
2. ECharts 库通过 CDN 方式引入 (https://cdn.jsdelivr.net/npm/echarts@5.5.0/dist/echarts.min.js)。
3. 根据 CSV 的列名和数据,智能地设置 `xAxis`, `yAxis`, 和 `series`。
4. 代码需要包含在 ```html ... ``` 代码块中。
"""
#启动服务
if __name__ == '__main__':
app.run(transport="streamable-http", mount_path="/mcp")
Tool:定义一个可执行的动作
Tool 是客户端可以调用的函数,用于执行一个操作,比如查询数据库、发送消息或更新记录。它类似于 REST API 中的 POST请求。
description 参数至关重要,它会告诉 AI Agent这个工具是做什么的、什么时候该使用它,直接影响模型调用工具的准确性,使用类型标注与pydantic的Field描述参数。
Resource:暴露只读上下文信息
Resource 是服务器公开的只读数据或上下文,比如数据库的表结构、文件的元信息等。它类似于 REST API 中的 GET 请求。客户端通过一个唯一的 URI (schema://table) 来访问它。
Prompt:提供预设的提示词模板
Prompt 是预定义的提示词模板,可以帮助用户或 Agent 更轻松地处理和格式化数据,减轻编写复杂提示词的负担。
启动服务
采用streamable-http方式启动MCP Server
调试
MCP 官方提供了一个基于 Web 的调试工具,可以方便地查看和调用 Server 暴露的功能。
确保已安装 Node.js 和 npm,在终端中运行以下命令:
npx @modelcontextprotocol/inspector
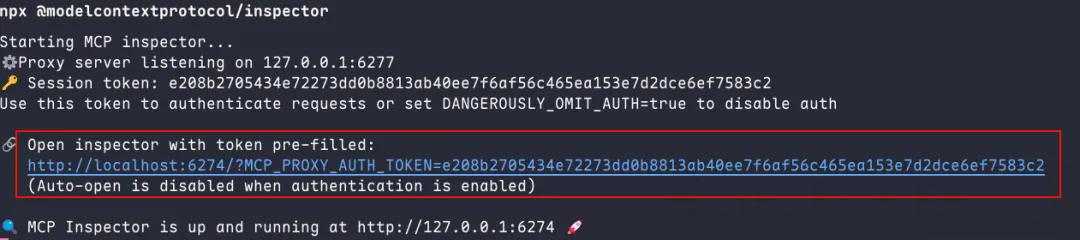
复制启动日志中的链接访问web ui,在输入框中填入你的 MCP Server 地址 (http://127.0.0.1:8000/mcp),然后点击 "Connect"。

MCP Client 实现
创建配置文件
在Client客户端目录下创建config.json配置文件:
{
    "mcpServers":{
        "filesystem-server":{
            "command":"npx",
            "args":[
                "@modelcontextprotocol/server-filesystem",
                "/home/wiley/mcp_learn"
            ]
        },
        "bi-server":{
            "type":"streamable-http",
            "url":"http://127.0.0.1:8000/mcp"
        }
    }
}
配置解析
filesystem-server 服务: 这是一个 stdio 类型的服务。
-
command: "npx" - 这意味着客户端会通过 npx 命令来启动这个工具服务。stdio 模式非常适合将本地命令行工具包装成 MCP 服务。
-
args: 传递给 npx 的参数。这里我们使用了一个社区提供的文件操作工具集。
bi-server 服务: 这是一个 streamable-http 类型的服务, 是我们上一讲的课程demo。
-
type: 指明连接类型。
-
url: 该服务监听的 HTTP 端点。这种类型适合连接网络上持续运行的 MCP 服务。
上代码mcp_client.py:
import asyncio
import json
import logging
import os
import shutil
from contextlib import AsyncExitStack
from datetime import timedelta
from typing importAny
from mcp import Tool, StdioServerParameters, stdio_client
from openai import OpenAI
from mcp.client.session import ClientSession
from mcp.client.streamable_http import streamablehttp_client
from openai.types.chat import ChatCompletionMessageParam, ChatCompletionMessage
openai_client: OpenAI = OpenAI(api_key="123456", base_url="http://192.168.11.199:1282/v1")
defconvert_mcp_to_openai_tools(mcp_tools: list) -> list:
"""将MCP Server返回的工具列表转换为OpenAI函数调用格式"""
openai_tools = []
for tool in mcp_tools:
tool_schema = {
"type": "function",
"function": {
"name": tool.name,
"description": tool.description,
"parameters": {}
}
}
input_schema = tool.inputSchema
parameters = {
"type": input_schema['type'],
"properties": input_schema['properties'],
"required": input_schema['required'],
"additionalProperties": False
}
for prop in parameters["properties"].values():
# 特殊处理枚举值
if"enum"in prop:
prop["description"] = f"可选值: {', '.join(prop['enum'])}"
tool_schema["function"]["parameters"] = parameters
openai_tools.append(tool_schema)
return openai_tools
classServer:
"""管理所有MCP Server的连接和工具执行"""
def__init__(self, name: str, config: dict[str, Any]) -> None:
self.name: str = name
self.config: dict[str, Any] = config
self.session: ClientSession | None = None
self._cleanup_lock: asyncio.Lock = asyncio.Lock()
self.exit_stack: AsyncExitStack = AsyncExitStack()
asyncdefinitialize(self) -> None:
"""初始化所有 MCP Server"""
try:
# streamable-http 方式
if"type"inself.config andself.config["type"] == "streamable-http":
streamable_http_transport = awaitself.exit_stack.enter_async_context(
streamablehttp_client(
url=self.config["url"],
timeout=timedelta(seconds=60)
)
)
read_stream, write_stream, _ = streamable_http_transport
session = awaitself.exit_stack.enter_async_context(
ClientSession(read_stream, write_stream)
)
await session.initialize()
self.session = session
# stdio 方式
if"command"inself.config andself.config["command"]:
command = (
shutil.which("npx")
ifself.config["command"] == "npx"
elseself.config["command"]
)
server_params = StdioServerParameters(
command=command,
args=self.config["args"],
env={**os.environ, **self.config["env"]}
ifself.config.get("env")
elseNone,
)
stdio_transport = awaitself.exit_stack.enter_async_context(
stdio_client(server_params)
)
read, write = stdio_transport
session = awaitself.exit_stack.enter_async_context(
ClientSession(read, write)
)
await session.initialize()
self.session = session
print(f"🔗 连接MCP服务 {self.name}...")
except Exception as e:
logging.error(f"❌ 初始化错误 {self.name}: {e}")
awaitself.cleanup()
raise
asyncdeflist_tools(self) -> list[Tool]:
"""从MCP Server列出所有工具"""
ifnotself.session:
raise RuntimeError(f"Server {self.name} not initialized")
tools_response = awaitself.session.list_tools()
return tools_response.tools
asyncdefexecute_tool(
self,
tool_name: str,
arguments: str,
retries: int = 2,
delay: float = 1.0,
) -> str | None:
"""执行工具"""
ifnotself.session:
raise RuntimeError(f"Server {self.name} not initialized")
arguments = json.loads(arguments) if arguments else {}
attempt = 0
while attempt < retries:
try:
logging.info(f"Executing {tool_name}...")
result = awaitself.session.call_tool(tool_name, arguments)
if result.isError:
print(f"Tool error: {result.error}")
print(f"\n🔧 Tool '{tool_name}' result: {result.content[0].text}")
return result.content[0].text
except Exception as e:
attempt += 1
logging.warning(
f"Error executing tool: {e}. Attempt {attempt} of {retries}."
)
if attempt < retries:
logging.info(f"Retrying in {delay} seconds...")
await asyncio.sleep(delay)
else:
logging.error("Max retries reached. Failing.")
raise
returnNone
asyncdefcleanup(self) -> None:
asyncwithself._cleanup_lock:
try:
awaitself.exit_stack.aclose()
self.session = None
except Exception as e:
logging.error(f"Error during cleanup of server {self.name}: {e}")
classClient:
def__init__(self, servers: list[Server]):
self.servers: list[Server] = servers
self.openai_tools: list[dict] = []
asyncdefcleanup_servers(self) -> None:
for server inreversed(self.servers):
try:
await server.cleanup()
except Exception as e:
logging.warning(f"Warning during final cleanup: {e}")
asyncdefget_response(self, messages: list[ChatCompletionMessageParam]) -> ChatCompletionMessage | None:
"""提交LLM,并获取响应"""
try:
completion = openai_client.chat.completions.create(
model="qwen3_32",
messages=messages,
tools=self.openai_tools,
tool_choice="auto"
)
return completion.choices[0].message
except Exception as e:
error_message = f"Error getting LLM response: {str(e)}"
logging.error(error_message)
returnNone
asyncdefstart(self):
"""开始MCP Client"""
for server inself.servers:
try:
await server.initialize()
except Exception as e:
logging.error(f"Failed to initialize server: {e}")
awaitself.cleanup_servers()
return
all_tools = []
for server inself.servers:
tools = await server.list_tools()
all_tools.extend(tools)
# 将所有工具转为openai格式
self.openai_tools = convert_mcp_to_openai_tools(all_tools)
awaitself.chat_loop()
asyncdefrun(self, messages: list[Any], tool_call_count: int = 0, max_tools: int = 5):
"""获取LLM响应"""
if tool_call_count > max_tools:
# 强制结束并返回提示信息
return messages.append({
"role": "assistant",
"content": "已达到最大工具调用次数限制"
})
tool_call_count += 1
llm_response = awaitself.get_response(messages)
result = awaitself.process_llm_response(llm_response)
messages.append(result)
if result["role"] == "tool":
awaitself.run(messages, tool_call_count)
return messages
asyncdefchat_loop(self):
system_message = (
"你是一个帮助人的AI助手。"
)
messages = [{"role": "system", "content": system_message}]
whileTrue:
try:
user_input = input("👨•💻: ").strip().lower()
if user_input in ["quit"]:
logging.info("\nExiting...")
break
messages.append({"role": "user", "content": user_input})
result = awaitself.run(messages)
reply = result[-1]["content"]
print(f"\n 🤖 : {reply}")
except KeyboardInterrupt:
print("\n\n👋 Goodbye!")
break
except EOFError:
break
asyncdefprocess_llm_response(self, llm_response: ChatCompletionMessage) -> dict:
""""""
tool_call = llm_response.tool_calls
if tool_call:
tool_call = tool_call[0].function
logging.info(f"Executing tool: {tool_call.name}")
logging.info(f"With arguments: {tool_call.arguments}")
for server inself.servers:
tools = await server.list_tools()
ifany(tool.name == tool_call.name for tool in tools):
try:
result = await server.execute_tool(tool_call.name, tool_call.arguments)
logging.info(f"Tool execution result: {result}")
return {"role": "tool", "content": result}
except Exception as e:
error_msg = f"Error executing tool: {str(e)}"
logging.error(error_msg)
return {"role": "assistant", "content": llm_response.content}
asyncdefmain():
# 读取mcp server配置文件
withopen("config.json", "r") as f:
config = json.load(f)
servers = [
Server(name, srv_config)
for name, srv_config in config["mcpServers"].items()
]
print("Simple MCP Client")
client = Client(servers)
await client.start()
defcli():
"""CLI entry point for uv script."""
asyncio.run(main())
if __name__ == "__main__":
cli()
代码解析
-
convert_mcp_to_openai_tools 函数:
作用: 这是连接 MCP 生态和 OpenAI API 生态的桥梁。此函数就是做个简单的转换。
-
Server.initialize方法
核心功能: 这是连接逻辑的所在。它通过判断 config 中的 type 或 command 字段来决定使用 streamable-http 还是 stdio 连接方式。
资源管理: 这里使用了 contextlib.AsyncExitStack。它是一个异步的退出栈,可以确保我们进入的每一个异步上下文(比如 stdio_client 和 ClientSession)在 Server 生命周期结束时,都会被正确地、按相反的顺序关闭。这极大地增强了程序的健壮性,避免了资源泄露。
-
Server.list_tools方法:
获取所有工具:使用mcp sdk提供的session.list_tools()获取当前服务的工具
-
Server.execute_tool方法:
执行工具调用:使用mcp sdk提供的session.call_tool调用指定工具,这里增加了重试次数
-
Client.get_response:
调用LLM:接收用户消息和工具列表,与LLM通信
-
Client.start:
初始化MCP Server:并获取所有工具,准备启动聊天
-
Client.chat_loop:
用户输入: 启动聊天循环,接收用户简单的退出指令。
-
Client.run:
多轮工具调用: run方法通过一个递归,支持模型进行连续的工具调用(例如,先搜索信息,再根据信息写入文件),直到它认为任务完成或者达到最大调用次数限制。
-
Client.process_llm_response:
处理LLM响应: 如果模型返回的消息为工具调用,则执行execute_tool方法执行调用,否则直接回答用户。
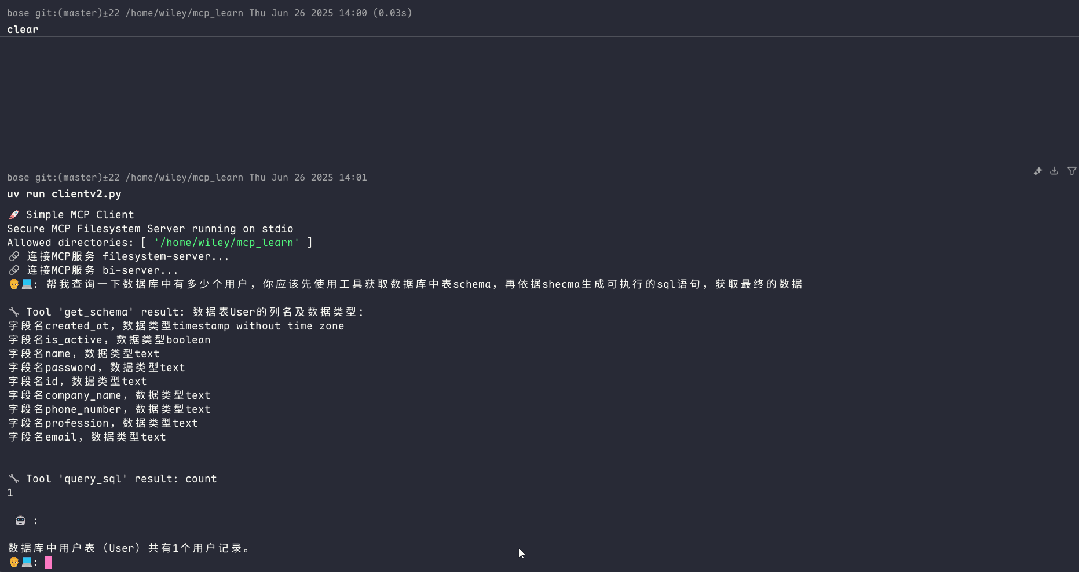
运行效果
调用bi-server服务,获取数据库中的记录
调用filesystem-server服务,查询数据用户信息,并写入本地文件
通过这个实现,你可以构建一个真正强大的、可扩展的AI Agent系统。
目前,MCP 官方生态中已经涌现出一些优秀的 MCP 应用,例如 Cursor, Cline, Warp, 和 Windsurf 等,
更多MCP动态可查看官方列表:https://modelcontextprotocol.io/clients